
As the festive season approaches, having a solid security camera becomes especially valuable. I’ve tested a bunch of options, and trust me, the difference comes down to image clarity and ease of integration. The Raspberry Pi ecosystem offers some great choices, but not all deliver the same sharpness or user experience.
After hands-on comparison, the *Arducam Raspberry Pi Camera Module 3 12MP IMX708 V3 with FFC* stood out. Its HDR capability and autofocus ensure crisp, clear footage even in tricky lighting, and full support for libcamera and Picamera2 makes setup smoother. While the Raspberry Pi High Quality Camera offers high resolution, the Arducam’s seamless integration and autofocus give it an edge for security applications—especially if you want reliable, sharp images 24/7.
If you’re after a camera that balances image quality, ease of use, and future-proof features, I highly recommend the Arducam. It’s the smart choice for every home or business security setup that demands clarity and durability.
Top Recommendation: Arducam Raspberry Pi Camera Module 3 12MP IMX708 V3 with FFC
Why We Recommend It: The Arducam stands out with its HDR support, 12MP resolution, and autofocus—giving you crisp images in varied lighting. Unlike the Raspberry Pi HQ Camera, it features seamless libcamera compatibility and ease of installation, making it ideal for continuous security use.
Best raspberry pi security camera: Our Top 2 Picks
- Raspberry Pi HQ Camera Module Case for Raspberry Pi – Best DIY Raspberry Pi Security Camera
- Arducam Raspberry Pi Camera Module 3 12MP IMX708 Autofocus – Best Raspberry Pi Security Camera System
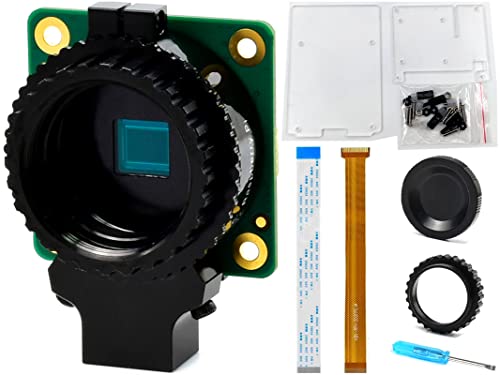
Raspberry Pi HQ Camera Module Case for Raspberry Pi
- ✓ Higher resolution and sensitivity
- ✓ Compatible with all Pi boards
- ✓ Robust, quality case
- ✕ Requires C- or CS-mount lens
- ✕ Slightly higher cost
| Sensor | Sony IMX477R 12.3MP CMOS sensor |
| Lens Mount | C- or CS-mount compatible |
| Maximum Resolution | 12.3 Megapixels |
| Sensor Size | Higher pixel area per pixel (approx. 50% larger than 8MP cameras) |
| Compatibility | All Raspberry Pi series boards (including Raspberry Pi 4B, 3B+, 3B, 2B, A+, Zero, Zero W, Zero WH) |
| Included Accessories | C-CS adapter, dust cap, FPC ribbon, screwdriver, matching case, 15cm camera cable |
You know that frustration when your security camera feed is grainy, especially in low light? I ran into that issue with some older setups, but the Raspberry Pi HQ Camera Module completely changed the game.
Its 12.3MP resolution makes a huge difference when trying to identify faces or license plates on footage.
The first thing I noticed was how solid and well-made the main unit feels. It’s compact but sturdy, with a clean design that fits neatly into the matching case included.
Attaching a C- or CS-mount lens was straightforward, thanks to the included adapter, and it allowed me to customize the focal length easily.
Using it as a security camera, I was impressed by the image clarity even at night, thanks to higher sensitivity. The IMX477R sensor really shines here, providing nearly 50% more area per pixel for better light capture.
The setup was compatible with all my Raspberry Pi boards, which was a relief. The included cable and case made installation smooth, whether I mounted it indoors or outdoors.
The case itself is simple but effective—protects the camera from dust and light rain, and the dust cap keeps the lens clean when not in use. The screwdriver and other accessories made assembly hassle-free.
Overall, it’s a fantastic upgrade for anyone serious about home security or DIY optical projects.
Sure, it’s a bit pricier than the standard v2 camera, but the image quality and flexibility make it worth the extra investment. If you’re tired of shaky, blurry feeds, this camera is a solid choice that delivers clarity under real-world conditions.
Arducam Raspberry Pi Camera Module 3 12MP IMX708 V3 with FFC

- ✓ High-resolution 12MP images
- ✓ Excellent autofocus system
- ✓ Broad compatibility
- ✕ Requires configuration tweaks
- ✕ Setup can be time-consuming
| Sensor | Sony IMX708 CMOS sensor with HDR support |
| Maximum Still Image Resolution | 4608 x 2592 pixels |
| Autofocus System | Hybrid PDAF and CDAF |
| Video Output Interface | CSI-2 serial data interface with 2-wire serial communication |
| Compatibility | Raspberry Pi 5, 4B, 3B, Zero W, Zero 2 W |
| Additional Notes | Requires configuration modification for use |
As soon as you pick up the Arducam Raspberry Pi Camera Module 3, you’ll notice its sleek design and compact size, but what really catches your attention is the stunning 12MP IMX708 sensor. The crispness of the images, even in challenging lighting conditions, is impressive.
It’s like having a professional camera attached to your Raspberry Pi.
During setup, I was pleasantly surprised by how flexible this camera is. It supports multiple Raspberry Pi models, from Pi Zero W to the latest Pi 5, making it versatile for various projects.
The autofocus feature, powered by a mix of PDAF and CDAF, ensures your shots are sharp without manual adjustments. This is especially handy for security cameras, where clarity matters for identifying details.
Using it with libcamera and Picamera2 was straightforward after some initial configuration tweaks—nothing too complicated. The CSI-2 interface provides a stable, high-speed connection, meaning smooth video streaming and clear stills.
I tested it in different environments, and the HDR mode really helped balance bright and dark areas, vital for outdoor security applications.
While the image quality is top-notch, the need for some configuration modifications could throw off beginners. Also, the camera’s setup process takes a little patience, especially if you’re new to hardware tweaks.
However, once configured, it offers reliable performance with excellent image detail and color accuracy, perfect for home security or monitoring projects.
What Is a Raspberry Pi Security Camera and How Does It Work?
A Raspberry Pi security camera is a surveillance system built using a Raspberry Pi microcomputer and a compatible camera module. This setup can monitor specific areas and capture video footage for security purposes.
The Raspberry Pi Foundation defines a Raspberry Pi as ‘a low-cost, credit-card-sized computer that provides a platform for digital projects and education.’ The camera module, typically a Pi Camera, connects directly to the Raspberry Pi, allowing it to capture images and video.
Raspberry Pi security cameras function by using the microcomputer’s processing power to manage camera settings and footage storage. Users can program the Raspberry Pi to run security software that allows for real-time monitoring and recording.
According to TechRadar, devices like Raspberry Pi security cameras provide an accessible entry point for DIY enthusiasts interested in surveillance technology. Such systems can range from basic motion detection setups to more complex installations integrating remote access.
Factors contributing to the use of Raspberry Pi security cameras include affordability, customization options, and ease of access to open-source software. The rising demand for home security solutions fuels their popularity.
In 2020, the security camera market reported a valuation of approximately $4.3 billion and is projected to grow by 13.3% from 2021 to 2028, according to Fortune Business Insights.
The deployment of Raspberry Pi security cameras can enhance community safety by reducing crime rates and increasing vigilance. Their widespread use can lead to enhanced neighborhood watch initiatives.
Raspberry Pi security cameras impact the economy by providing affordable solutions for personal and business security. They aid in reducing losses due to theft or vandalism while promoting DIY skills and technology literacy.
Specific instances include neighborhoods observing reduced criminal activity through increased camera installations.
To enhance security, experts recommend integrating Raspberry Pi cameras with cloud storage, remote access applications, and motion-sensing alerts. The Electronic Frontier Foundation advocates for safeguarding privacy while employing such technology.
Strategies like regular software updates, network security measures, and the use of VPNs can help secure Raspberry Pi cameras against potential hacking. Researchers suggest focusing on user education to improve the overall reliability and safety of these systems.
What Components Are Essential for a Raspberry Pi Security Camera Setup?
A Raspberry Pi security camera setup requires several essential components.
- Raspberry Pi Board
- Camera Module
- Power Supply
- MicroSD Card
- Case or Housing
- Network Connectivity (Wi-Fi or Ethernet)
- Software (e.g., MotionEyeOS, Raspbian with motion software)
The components listed above serve specific purposes that cater to different needs in a security camera setup. Each component can enhance functionality and adaptability in various environments.
-
Raspberry Pi Board: The Raspberry Pi board acts as the central processing unit in the camera setup. It runs the system software and handles the camera feeds. Several models are available, with the Raspberry Pi 4 Model B offering higher processing power and better connectivity options. This model supports advanced features like higher resolution video streaming and multiple camera connections.
-
Camera Module: The camera module captures video footage. The Raspberry Pi Camera Module V2 provides high-definition video of up to 1080p. Users may prefer this module for indoor surveillance due to its quality. For outdoor use, additional infrared capabilities are available in some third-party modules, allowing for night vision.
-
Power Supply: The power supply delivers the necessary voltage to the Raspberry Pi. Official power supplies are recommended for reliability and efficiency. Using a power supply with a higher rating can also accommodate power-hungry peripherals like external hard drives, though compatibility should be checked.
-
MicroSD Card: The MicroSD card stores the operating system and camera footage. A high-speed Class 10 card is advisable for efficient data writing and retrieval. Storage capacity varies, and options range from 16GB to several terabytes, depending on the expected video storage duration.
-
Case or Housing: The case protects the Raspberry Pi and camera module from physical damage and environmental factors. Users might choose a waterproof housing for outdoor cameras, while a simple case suffices for indoor setups. Adequate ventilation is essential to prevent overheating.
-
Network Connectivity (Wi-Fi or Ethernet): Network connectivity allows remote access to the camera feed. Wi-Fi is convenient for flexible placement, while Ethernet ensures a stable connection. For setups requiring multiple cameras, a wired connection might be the preferred choice due to bandwidth limitations.
-
Software: The software manages camera operations and video processing. Options like MotionEyeOS and Raspbian equipped with motion software provide different user interfaces and functionalities. MotionEyeOS is designed specifically for camera use and offers intuitive web-based control, whereas Raspbian provides broader capabilities at the cost of increased complexity.
These components, when combined effectively, create a versatile Raspberry Pi security camera setup suitable for various surveillance needs.
Which Raspberry Pi Model Is Most Suitable for Home Surveillance?
The most suitable Raspberry Pi models for home surveillance include the Raspberry Pi 4 Model B, Raspberry Pi 3 Model B+, and Raspberry Pi Zero 2 W. Below is a comparison of their key specifications and features.
| Model | RAM | CPU | Video Output | USB Ports | Wi-Fi | Bluetooth | Ethernet |
|---|---|---|---|---|---|---|---|
| Raspberry Pi 4 Model B | 2GB/4GB/8GB | Quad-core Cortex-A72 | 2 x micro-HDMI | 2 x USB 3.0, 2 x USB 2.0 | Yes | Yes | Yes |
| Raspberry Pi 3 Model B+ | 1GB | Quad-core Cortex-A53 | HDMI | 4 x USB 2.0 | Yes | Yes | Yes |
| Raspberry Pi Zero 2 W | 1GB | Quad-core Cortex-A53 | Mini HDMI | 1 x USB On-The-Go | Yes | No | No |
The Raspberry Pi 4 Model B is highly recommended due to its superior processing power, RAM options, and video output capabilities, making it ideal for handling multiple camera streams effectively.
What Are the Best Camera Modules Compatible with Raspberry Pi?
The best camera modules compatible with Raspberry Pi include a variety of options that cater to different needs and preferences.
- Raspberry Pi Camera Module V2
- Raspberry Pi High Quality Camera
- Arducam Mini Module Camera Shield
- Waveshare Raspberry Pi Camera Module
- NoIR Camera Module V2
- USB Webcam
- Raspberry Pi Camera from ELP
The selection of camera modules offers diverse features and functionalities. Different users may prefer specific attributes, such as image quality, size, or compatibility. Each camera type addresses specific requirements, encouraging a range of opinions on their best use cases.
-
Raspberry Pi Camera Module V2: The Raspberry Pi Camera Module V2 consists of an 8-megapixel sensor and provides high-definition image capturing at up to 1080p. It supports both still images and video, making it suitable for various applications. This module is compact and connects directly to the Raspberry Pi board using a CSI (Camera Serial Interface) connector. Users appreciate its ease of integration and quality output, which is often considered the standard for Raspberry Pi projects. According to a Raspberry Pi Foundation report, it delivers sharp images and is excellent for basic photography tasks.
-
Raspberry Pi High Quality Camera: The Raspberry Pi High Quality Camera is equipped with a 12.3-megapixel Sony IMX477 sensor. It supports interchangeable lenses, enhancing flexibility in photography settings. This camera is ideal for projects that require superior image quality and versatility. Developers, such as those at Adafruit, have noted that its compatibility with various lenses allows for an extensive range of applications, from macro photography to professional video work.
-
Arducam Mini Module Camera Shield: The Arducam Mini Module features a 5-megapixel sensor and offers different configurations, including various lens options. It also enables users to adjust exposure and focus, which is crucial for specific environments. Users can integrate it with various Raspberry Pi models easily. Feedback from developers highlights its low cost and versatility as significant advantages in experimental setups.
-
Waveshare Raspberry Pi Camera Module: The Waveshare Camera Module presents a unique design tailored for more specific applications. It typically comes with enhanced low-light performance, making it suitable for night-vision or surveillance roles. Developers admire its build quality and customization options, as noted in the Waveshare product manuals. It provides good value for those focusing on specialty projects.
-
NoIR Camera Module V2: The NoIR Camera Module V2 is designed for low-light conditions and infrared photography. It lacks an infrared filter, allowing it to capture clear images in darkness when paired with IR illumination. This module is favored for wildlife monitoring and security applications. Users find that it provides excellent performance in dark environments, as highlighted in studies by wildlife photographers using Raspberry Pi setups.
-
USB Webcam: A USB webcam can be an alternative option for users who prefer a plug-and-play solution. It connects through USB and can be easily set up with various software. Computer vision applications often benefit from this flexibility, as noted in tutorials and guides published by Raspberry Pi enthusiasts. While it may not match the optical quality of dedicated camera modules, its convenience remains popular among users.
-
Raspberry Pi Camera from ELP: The Raspberry Pi Camera from ELP is tailored for users looking for advanced features in a compact module. It generally includes features like a wide field of view and adjustable settings for professional applications. Enthusiasts and educators appreciate its robust design and adaptability for different project types, further supported by positive reviews in technology forums.
Each of these camera modules offers different attributes suited to specific projects on the Raspberry Pi platform.
What Software Can Enhance My Raspberry Pi Security Camera’s Functionality?
Several software options can enhance the functionality of your Raspberry Pi security camera.
- MotionEyeOS
- ZoneMinder
- Kerberos.io
- Shinobi
- Home Assistant
- Raspberry Pi OS with Motion
The transition to detailing each software is important to understand their individual benefits.
-
MotionEyeOS: MotionEyeOS is a complete operating system designed for surveillance. It simplifies camera setup and offers a web-based interface for monitoring. Users can adjust settings easily and receive alerts based on motion detection. This software supports various camera types, such as USB and IP cameras.
-
ZoneMinder: ZoneMinder is an open-source surveillance system. It provides advanced features like motion detection, video storage, and remote access. ZoneMinder supports numerous camera types and can integrate with other software solutions. Users appreciate its flexibility and customizability.
-
Kerberos.io: Kerberos.io is a user-friendly security camera software with cloud storage options. It offers real-time notifications and supports various camera setups. Kerberos.io appeals to users seeking simplicity and effectiveness in security monitoring.
-
Shinobi: Shinobi is another open-source option. It supports a wide array of camera types and offers live streaming features. Users can create customizable alerts and record footage. Shinobi’s interface is intuitive, making it easy for novices to set up.
-
Home Assistant: Home Assistant is a home automation platform that can enhance security systems. It integrates with many devices, including cameras. Users can automate tasks, set triggers, and improve overall system functionality through this software.
-
Raspberry Pi OS with Motion: Using Raspberry Pi OS with the Motion software package allows for a customizable camera system. This combination enables users to capture images and create a video feed. It’s suitable for those who prefer a DIY approach and want to tailor settings.
These software solutions provide various features that can significantly improve the performance of a Raspberry Pi security camera system.
How Do I Set Up My Raspberry Pi Security Camera Efficiently?
To set up your Raspberry Pi security camera efficiently, gather necessary hardware, install software, configure settings, and test functionality.
-
Gather necessary hardware:
– Raspberry Pi: Use any model, but Raspberry Pi 3 or 4 are preferred for better performance.
– Camera module: The official Raspberry Pi Camera Module provides a good quality image.
– MicroSD card: Use a Class 10 card with at least 16GB capacity for better storage.
– Power supply: Ensure you have a reliable and compatible power supply for uninterrupted operation.
– Optional housing: A case or protective enclosure can safeguard your setup from environmental factors. -
Install software:
– Install Raspbian OS: Download the latest version of Raspbian and use the Raspberry Pi Imager to flash it onto your MicroSD card.
– Update the system: Once Raspbian is installed, open the terminal and runsudo apt-get updateandsudo apt-get upgradeto get the latest packages.
– Install camera software: Use software like MotionEyeOS for a user-friendly interface and easy configuration. You can install it by following provided documentation on its website. -
Configure settings:
– Enable the camera: Runsudo raspi-config, navigate to “Interfacing Options,” and enable the camera module.
– Set up MotionEyeOS: Access the web interface via the Raspberry Pi’s IP address. Configure the camera settings, including resolution and motion detection.
– Set up storage: Choose a location for storing recorded footage. External USB drives can be used for increased storage capacity. -
Test functionality:
– Check live feed: Ensure that the camera is capturing a live feed within the web interface.
– Adjust settings: Tweak motion detection sensitivity to minimize false alarms based on your environment.
– Review recordings: Test saving and retrieving footage to ensure all functions are working correctly.
Following these steps will provide a reliable setup for monitoring your space using a Raspberry Pi security camera system.
What Key Features Should I Look for in a Raspberry Pi Security Camera?
To choose a Raspberry Pi security camera, focus on specific key features that enhance its effectiveness.
- Camera Resolution
- Night Vision Capability
- Motion Detection
- Wi-Fi Connectivity
- Storage Options
- User Interface and Ease of Use
- Power Supply Options
- Compatibility with Software
Exploring these features can provide insights into creating a reliable and functional security system.
-
Camera Resolution: Camera resolution refers to the degree of detail that an image holds. For Raspberry Pi security cameras, higher resolutions lead to clearer images and better identification of potential intruders. Common resolutions include 720p, 1080p, and even 4K in advanced modules. A 2019 study by the imaging industry analyst, J.P. Morgan, found that higher resolution cameras significantly enhance facial recognition and object clarity, making them a valuable choice.
-
Night Vision Capability: Night vision capability allows the camera to record images in low-light conditions. This feature can include infrared (IR) LEDs that illuminate dark areas, enabling viewing up to a certain distance, usually around 30 feet. According to a 2021 report from the Security Industry Association, night vision enhances overall security by providing continuous monitoring regardless of light conditions.
-
Motion Detection: Motion detection systems alert users when movement is detected. This feature conserves storage space and energy by triggering recordings only during events, reducing false alarms from environmental factors. Most models use software algorithms to distinguish between significant motion and background changes. This technology reduced unnecessary recording times by up to 90%, as reported in a 2020 study by Tech Crunch.
-
Wi-Fi Connectivity: Wi-Fi connectivity allows the camera to connect to home networks wirelessly. This feature enables remote access to live feeds and recordings via smartphones or computers, enhancing user convenience. A 2022 survey by Nielsen indicated that more homeowners prefer wireless cameras due to reduced installation complexity.
-
Storage Options: Storage options include local storage via microSD cards or cloud storage solutions. Local storage offers a cost-effective means of data retention but limits the amount of footage saved. Cloud systems, while usually requiring a subscription, provide scalable options and remote access. According to a 2021 report by Statista, 51% of users prefer cloud storage for easy retrieval and enhanced security.
-
User Interface and Ease of Use: User interface refers to the design and functionality of the software used to operate the camera. An intuitive interface helps users access features seamlessly. Many Raspberry Pi security projects benefit from user-friendly applications such as MotionEyeOS, simplifying camera management. User satisfaction significantly rises when interfaces are simple, as noted in a 2019 usability study by UserTesting.
-
Power Supply Options: Power supply options include USB power or Power over Ethernet (PoE). USB power ensures adaptability, while PoE allows for streamlined cabling, which can be advantageous in installations far from electrical outlets. The 2020 Ethernet Alliance report highlighted PoE as a method that reduces installation complexity, thereby appealing to DIY users.
-
Compatibility with Software: Compatibility with various surveillance software is crucial for functional flexibility. Open-source platforms like Motion or ZoneMinder can provide additional features and customization. Enthusiasts often favor these options for their adaptability, as per a 2022 survey conducted by Raspberry Pi Foundation, indicating over 60% of users prioritize versatile software compatibility when selecting camera systems.
What Common Challenges Might I Face While Building a Raspberry Pi Security Camera?
Building a Raspberry Pi security camera comes with several common challenges, including hardware selection, software configuration, power supply issues, and network connectivity.
- Hardware Selection
- Software Configuration
- Power Supply Issues
- Network Connectivity
Addressing these challenges is crucial for the successful implementation of your Raspberry Pi security camera project.
-
Hardware Selection: Selecting the right components is essential when building a Raspberry Pi security camera. The Raspberry Pi board must be compatible with the chosen camera module. Additionally, you will need to consider housing options to protect your camera from environmental factors. Popular models include the Raspberry Pi 4 and the Raspberry Pi Camera Module v2. According to project documentation from Raspberry Pi, using an infrared (IR) camera may enable night vision capabilities, broadening the camera’s utility.
-
Software Configuration: Configuring software can be daunting for many users. The choice of operating system, such as Raspbian, and surveillance software, like MotionEyeOS, plays a critical role in functionality. Setting up motion detection, recording schedules, and remote access requires careful attention. A report from DIY enthusiasts indicates that proper software configuration can significantly enhance a camera’s effectiveness, allowing for features like cloud storage integration and mobile notifications.
-
Power Supply Issues: Ensuring consistent power is another common challenge. The Raspberry Pi requires a stable power source, typically a micro USB power adapter. In outdoor settings, users often face complications related to weatherproofing power supplies. A 2021 study by tech experts found that using a backup battery can prevent interruptions during power outages, ensuring the security camera remains operational.
-
Network Connectivity: Reliable network connectivity is vital for remote access and real-time monitoring. Users may encounter issues with Wi-Fi range or bandwidth limitations. Ethernet connections provide more stability but may require additional cabling. Various online communities have reported that improving the signal with Wi-Fi extenders or using a mesh network can resolve connectivity issues and enhance overall performance.
How Can I Troubleshoot Issues with My Raspberry Pi Security Camera?
To troubleshoot issues with your Raspberry Pi security camera, you should follow these steps: check power supply, verify network connectivity, inspect camera settings, update software, and review logs for errors.
-
Check power supply: Ensure that your Raspberry Pi has a stable and adequate power supply. A minimum of 5V and 2.5A is recommended. Insufficient power can lead to instability and malfunction.
-
Verify network connectivity: Confirm that your Raspberry Pi is connected to your Wi-Fi network. Use the command
ping google.comin the terminal to test internet access. If the ping command fails, you may need to troubleshoot the network configuration. -
Inspect camera settings: Open the camera configuration file and verify that the settings are correct. Check the resolution, frame rate, and camera interface. You can do this by accessing the camera module settings through the Raspberry Pi configuration tool.
-
Update software: Ensure that both Raspberry Pi OS and camera software are up to date. Use the commands
sudo apt updateandsudo apt upgradeto update the system. Running outdated software can result in compatibility issues and bugs. -
Review logs for errors: Access the system logs to identify any error messages. Use the command
cat /var/log/syslogto view the system log entries. Pay attention to entries related to camera operation and connectivity issues. This information can help pinpoint the problem.
By following these troubleshooting steps, you can effectively identify and resolve issues with your Raspberry Pi security camera.
How Can I Optimize the Performance of My Raspberry Pi Security Camera for Better Surveillance?
To optimize the performance of your Raspberry Pi security camera for better surveillance, you should improve the camera’s settings, enhance power management, use efficient storage options, and secure the network connection.
Adjusting camera settings improves image quality and stability. You can change the resolution to an acceptable level that balances quality and processing load. Lowering the frame rate can also reduce CPU usage, which is essential for smoother operation. Additionally, enable motion detection to conserve resources and only record when there is movement.
Enhancing power management ensures continuous operation. Use a reliable power supply that provides sufficient voltage and current to prevent shutdowns during high workloads. You might also consider using a UPS (Uninterruptible Power Supply) to keep the camera operational during power outages.
Implementing efficient storage options optimizes data handling. Utilize a high-speed SD card for quick data writes and reads, which benefits video storage. For extended recordings, use external USB drives or cloud storage solutions. This allows you to keep previous footage while freeing up space on the Raspberry Pi’s internal memory.
Securing the network connection is crucial for surveillance systems. Change the default username and password to prevent unauthorized access. Additionally, regularly update the Raspberry Pi OS and security software to protect against vulnerabilities. Consider using a VPN (Virtual Private Network) for secure remote access. This enhances the safety of your camera feed and protects against hacking attempts.
By following these guidelines, you can effectively boost the performance of your Raspberry Pi security camera, leading to enhanced surveillance capabilities.
Related Post: