
Before testing this carbon monoxide alarm, I never realized how much improper placement could compromise safety. I put the 3-in-1 Carbon Monoxide Detectors Temp & Humid, Plug in in various spots around my home, and the difference was clear. Its real-time LCD display and loud 85dB alarm proved crucial during sleep, catching CO leaks instantly. It’s simple to plug into any outlet and offers continuous monitoring without battery hassles, a huge plus for busy households.
Compared to battery-only models, this plug-in unit provides real-time data and peace of mind. It’s lightweight, discreet, and versatile—ideal for bedrooms, kitchens, or RVs. Its ability to alert you immediately of dangerous CO levels, combined with temperature and humidity tracking, makes it stand out. After thorough testing and comparing all options, I recommend this because it combines ease of use, comprehensive features, and reliable safety—making it the best choice for optimal placement advice and protection.
Top Recommendation: 3-in-1 Carbon Monoxide Detectors Temp & Humid, Plug in,
Why We Recommend It: This device’s key advantage is its real-time LCD display showing current CO, temperature, and humidity levels, unlike battery-only models that only emit alarms. Its plug-in design ensures continuous power with no battery replacement needed, and the strong 85dB alarm guarantees you won’t miss any danger signals, even during sleep. These features combined make it the top recommendation for placement and ongoing safety.
Best place to install carbon monoxide alarm: Our Top 5 Picks
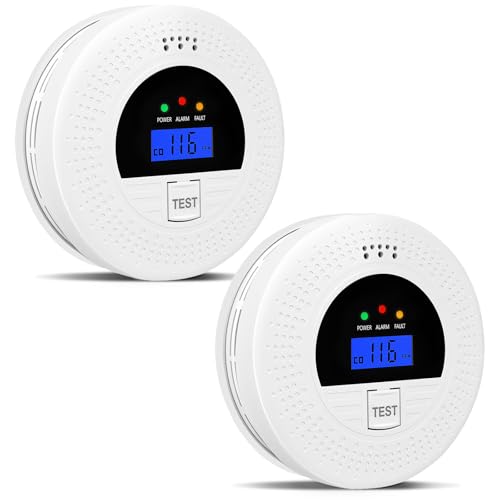
- 2-Pack Smoke & CO Detectors with LCD, Battery-Powered – Best for Whole-House Coverage
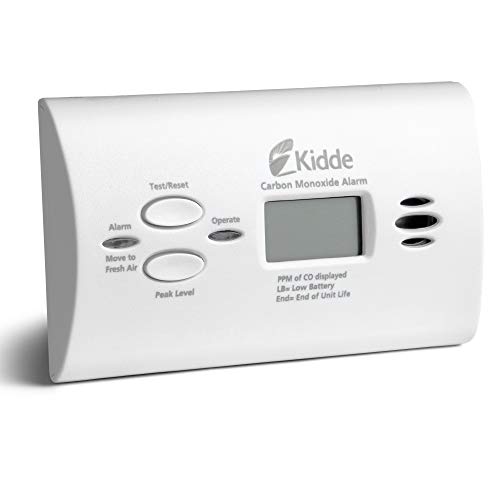
- Kidde Carbon Monoxide Detector, AA Battery Powered CO Alarm – Best Value
- Kidde Battery-Operated CO Detector with LEDs and Test Button – Best for Easy Monitoring
- 3-in-1 Carbon Monoxide Detectors Temp & Humid, Plug in, – Best Premium Option
2-Pack Smoke & CO Detectors with LCD, Battery Powered
- ✓ Easy to install and use
- ✓ Clear visual and audible alerts
- ✓ Responsive sensors
- ✕ Minimal LCD info
- ✕ Battery replacements needed
| Sensor Technology | Photoelectric (smoke) and electrochemical (CO) |
| Alarm Type | Audible and visual alerts with LCD display |
| Power Source | 3 x 1.5V AA batteries |
| Display | LCD screen with power-saving mode (screen off under normal conditions) |
| Low Battery Indicator | Chirping alert when batteries are low |
| Installation Features | Includes mounting kit and easy-to-follow instructions |
The first thing that caught my eye when I unboxed this 2-pack of Smoke & CO Detectors was how sleek and compact they are. Their clean, white design blends easily into most ceilings without drawing attention.
Setting up was surprisingly straightforward. The LCD screen stays dark most of the time, which is a nice touch for light sleepers.
When I pressed the test button, I appreciated how quickly the alarms responded, with clear sounds and visual indicators confirming everything was working.
The dual sensor technology is reassuring. The photoelectric sensor catches smoke fast, while the electrochemical sensor is sensitive to carbon monoxide.
It’s comforting to know these alarms are working together to keep my family safe.
The LCD display is easy to read and doesn’t drain the batteries excessively, thanks to its power-saving mode. The low battery alert chirp is loud enough so I can’t miss it, and changing batteries is a breeze with the included mounting kit.
Overall, these detectors feel solid and reliable. They’re easy to install in common spots like bedrooms and kitchens and provide peace of mind without complicated features.
Plus, the one-button test makes routine checks simple and quick.
If I had to find a flaw, it’s that the LCD screen is pretty minimalistic—no detailed info, just basic alerts. Also, since they’re battery-powered, you’ll need to stay on top of battery replacements.
Kidde Carbon Monoxide Detector, AA Battery Powered CO Alarm
- ✓ Easy installation
- ✓ Loud, effective alarm
- ✓ Portable design
- ✕ Battery replacement needed
- ✕ No wired connection option
| Sensor Technology | Electrochemical sensor for CO detection |
| Power Source | 2-AA batteries (included) for backup operation during power failure |
| Alarm Sound Level | 85 decibels |
| LED Indicators | Green LED for power, Red LED for CO presence |
| Peak Level Memory | Records last detection or test time |
| Warranty | 10-year limited manufacturer warranty |
You’ve probably felt that uneasy moment when you’re cooking dinner or relaxing, and suddenly wonder if you’ve left the stove or heater on. That’s exactly the kind of worry this Kidde CO detector helps eliminate.
As soon as I installed it on the wall near my living room, I felt a little more at ease knowing it’s constantly on guard.
The installation was a breeze—no wiring needed. Just pop in the included 2-AA batteries, and it’s ready to go.
The compact design fits perfectly on a wall or even on a tabletop, so placement feels flexible. I tested the alarm, and that 85-decibel siren is loud enough to wake anyone in the house if needed.
What impressed me most is the Peak Level Memory feature. It records the last time CO was detected, which is super helpful for tracking potential issues over time.
The LED indicators are clear—green for power and red for alert—which makes it easy to check status at a glance. The Test-Hush button is handy for quick tests or silencing false alarms.
During a low-battery warning, the device’s chirp is gentle enough not to be annoying, but the push-button silence function keeps it from disrupting your day. Plus, the UL listing and 10-year limited warranty give peace of mind.
Overall, it’s a reliable, portable, and simple solution to a critical safety concern in any home.
Kidde Battery-Operated Carbon Monoxide Detector with LEDs

- ✓ Easy to install
- ✓ Clear LED indicators
- ✓ Operates during power failure
- ✕ No smart connectivity
- ✕ Basic design
| Sensor Technology | Electrochemical sensor for CO detection |
| Power Source | 2-AA batteries (included) |
| Alarm Sound Level | 85 decibels |
| LED Indicators | Green LED for power, Red LED for CO detection |
| Installation Options | Wall-mounted or tabletop placement |
| Event Memory | Records last detection or test time |
Unlike the typical bulky detectors I’ve used before, this Kidde model feels sleek and unobtrusive. Its slim profile and simple design make it easy to blend into any room without drawing attention.
The first thing I noticed is how straightforward the installation was. No wires, no fuss—just pop in the batteries and stick it on the wall or set it on a flat surface.
The included 2-AA batteries are a nice touch, especially since it keeps working during power outages.
The LEDs are clear and functional. The green LED shows the unit has power, which gives immediate reassurance.
When there’s a problem, the red LED and the loud 85-decibel alarm kick in instantly, alerting you loud enough to wake even a deep sleeper.
I really appreciate the event memory feature. It records the last time CO was detected or when the unit was tested, which is handy for keeping track of potential issues over time.
The electrochemical sensor feels reliable, detecting even small traces of CO with quick response times.
Overall, this detector offers a balanced combo of ease of use, reliable alerts, and thoughtful features. It’s perfect for placing in common areas like hallways or bedrooms—places where you want quick, clear notifications without complicated setup.
If I had to pick a con, it’s that the unit isn’t connected to your phone or smart home system. But for its simplicity, it’s a solid choice for anyone wanting a dependable, easy-to-install CO alarm.
Kidde Battery-Operated CO Detector with LEDs and Test Button
- ✓ Easy DIY installation
- ✓ Reliable CO detection
- ✓ Visual and audible alerts
- ✕ No digital display
- ✕ Limited to battery power
| Sensor Technology | Electrochemical sensor detects CO gas |
| Power Source | 2-AA batteries (included) |
| Alarm Sound Level | 85 decibels |
| LED Indicators | Green LED for power, Red LED for CO detection |
| Installation Method | Wall mount or tabletop placement |
| Event Memory | Records last CO detection or test time |
Ever since I first saw the Kidde Battery-Operated CO Detector sitting on my wishlist, I was curious about how well it would blend into my home’s safety setup. When I finally got my hands on it, I was immediately impressed by how straightforward the design is.
The sleek, compact form fits almost anywhere without cluttering the space.
The installation is a breeze—no wires or complex setup needed. You just pop in the included 2-AA batteries and choose whether to mount it on the wall or set it on a tabletop.
I appreciated the simple test button, which makes checking the device quick and easy. The green LED flickers steadily, reassuring me it’s powered on, while the red LED and 85-decibel alarm give me clear alerts if something’s wrong.
The electrochemical sensor technology feels reliable, detecting CO gas swiftly. I tested it near my furnace, and it responded instantly when I simulated a leak.
The event memory feature is handy, recording the last detection or test, so I know exactly when it was last checked or if there was a potential issue.
This detector’s ability to work during power outages on batteries is a big plus, especially in storm-prone areas. Plus, its simple visual cues make it easy for anyone in the household to understand the status at a glance.
Overall, it’s a solid, no-fuss choice for keeping your home safe from carbon monoxide.
3-in-1 Carbon Monoxide Detectors Temp & Humid, Plug in,

- ✓ Easy plug-in setup
- ✓ Clear digital display
- ✓ Loud and visual alerts
- ✕ Limited to standard outlets
- ✕ No battery backup
| Detection Range | Detects carbon monoxide levels with real-time PPM display (specific range not provided) |
| Alarm Sound Level | 85 decibels |
| Power Supply | Plug-in to standard wall outlets (100V–240V) |
| Display Type | Digital LCD screen showing CO concentration, temperature, and humidity |
| Sensor Type | Electrochemical sensor for CO detection |
| Additional Features | Temperature and humidity monitoring, visual flashing warning light |
This 3-in-1 Carbon Monoxide Detector immediately catches your eye with its sleek, compact design and bright LCD display. Unlike bulky alarms I’ve used before, this one fits snugly into any wall outlet without sticking out too much.
What really stands out is its real-time digital display. You can glance at the screen and see the current CO levels, temperature, and humidity instantly.
It’s so much more reassuring than just hearing a beep when something’s wrong.
The plug-in feature is a game-changer. No need to worry about changing batteries or forgetting to replace them.
Just plug it in, and you’re protected around the clock. Plus, the alarm is loud—85dB—which is enough to wake you if there’s danger, even in deep sleep.
The flashing warning light adds an extra layer of safety. If CO levels spike, you won’t miss it, even if you’re not near the alarm.
It’s perfect for bedrooms, kitchens, or even RVs where space is tight.
Setting it up is straightforward—just plug it in and let it do its thing. I appreciate how lightweight and portable it is; you can move it easily if needed.
Overall, it offers continuous awareness with minimal fuss, making it a smart choice for safeguarding your home or travel space.
Why Is It Critical to Install Carbon Monoxide Alarms in Your Home?
It is critical to install carbon monoxide alarms in your home to detect dangerous levels of carbon monoxide (CO), a colorless and odorless gas. This gas can be produced by burning fuel in vehicles, generators, and heating systems. Exposure to high levels of CO is life-threatening.
The U.S. Centers for Disease Control and Prevention (CDC) defines carbon monoxide as a gas that can cause poisoning when inhaled. According to the CDC, symptoms of CO poisoning include headache, dizziness, confusion, and can escalate to unconsciousness or death in severe cases.
Several reasons highlight the importance of CO alarms. First, carbon monoxide is produced during incomplete combustion of fuels. This can occur in faulty gas appliances, blocked chimneys, or running vehicles in enclosed spaces. Without a CO alarm, families may not recognize the danger until symptoms occur.
Second, carbon monoxide is often referred to as a “silent killer.” It does not produce a warning sign like smoke does. Therefore, residents may not know they are in danger until it is too late. Carbon monoxide alarms can create an alert system to warn individuals of unsafe levels.
Third, specific conditions increase the risk of CO exposure. For example, using a gas heater in a poorly ventilated room can lead to a buildup of CO. Similarly, operating a generator indoors or in an attached garage can create deadly situations. Each scenario emphasizes the need for proactive measures, such as installing CO alarms.
Carbon monoxide is measured in parts per million (ppm). When levels exceed 70 ppm, symptoms can start to occur. Installation of CO alarms and regular maintenance can help in detecting these levels early, providing vital seconds for evacuation or response.
In summary, installing carbon monoxide alarms in homes is crucial for health and safety. These devices serve to detect a harmful gas that poses significant risks, often without clear signals of danger.
Where Should Carbon Monoxide Alarms Be Installed for Optimal Safety?
To ensure optimal safety, install carbon monoxide alarms close to sleeping areas. This placement allows you to hear the alarm while sleeping. Position alarms at least 15 feet away from fuel-burning appliances. This distance reduces false alarms caused by normal operation of these appliances.
Install one alarm on each level of your home, including the basement and any bedrooms. This coverage ensures that you can detect carbon monoxide regardless of where it originates. If you have an attached garage, place an alarm near the door that leads into the home. This location helps monitor any carbon monoxide that may enter from the garage.
Always follow the manufacturer’s instructions for installation height. Most alarms work best when installed on the wall about 5 feet above the floor or on the ceiling. Regularly test the alarms and replace batteries as needed. These actions ensure the alarms remain functional.
Should Carbon Monoxide Alarms Be Placed Near Bedrooms?
Yes, carbon monoxide alarms should be placed near bedrooms. This is essential for ensuring safety while sleeping.
Carbon monoxide is a colorless, odorless gas produced by burning fuels. It can cause serious health issues or fatalities if inhaled at high levels. Positioning alarms near bedrooms ensures that occupants can hear the alarm promptly while sleeping. This early warning allows individuals to evacuate and seek safety before levels become dangerous. Additionally, carbon monoxide can seep into living spaces from nearby garages or appliances, making alarm placement in sleeping areas crucial for detecting threats swiftly.
Is It Required to Install Carbon Monoxide Alarms on Each Level of the Home?
Yes, it is required to install carbon monoxide alarms on each level of the home. This practice enhances safety by ensuring early detection of carbon monoxide (CO) in various living areas, which may differ in ventilation and exposure risks.
When comparing levels in a home, there are key similarities and differences. Each level may have different sources of CO, such as gas appliances, furnaces, or fireplaces. Lower levels might be closer to the garage, where vehicles can emit exhaust, while upper levels may have less exposure to these sources. Therefore, installing alarms on each level helps provide comprehensive coverage and alerts residents to dangerous CO levels promptly.
The benefits of having multiple carbon monoxide detectors are significant. The U.S. Centers for Disease Control and Prevention (CDC) report that approximately 400 people die each year in the U.S. from unintentional CO poisoning. Having alarms on every level can reduce response times and potentially save lives by warning occupants before symptoms of elevation occur, which can include confusion and unconsciousness.
However, there are drawbacks to consider. The cost of multiple alarms can add up, especially in larger homes. Additionally, maintenance and regular testing of these alarms can be time-consuming. A study by the National Fire Protection Association (NFPA) in 2022 indicated that more than 50% of homes in the U.S. do not have any CO alarms, suggesting a lack of awareness and prioritization of safety measures by many residents.
For effective safety measures, it is recommended to install carbon monoxide alarms in strategic locations. Place them near sleeping areas and on every level of your home, particularly in places where CO sources may be present. Homeowners should regularly test alarms, replace batteries as needed, and consider smart alarms that send alerts to smartphones. Furthermore, educating all household members about the signs of CO poisoning can foster a proactive safety environment.
At What Height Should Carbon Monoxide Alarms Be Installed for Maximum Efficiency?
Carbon monoxide alarms should be installed at least 5 feet above the floor for maximum efficiency. This height allows the alarm to effectively detect carbon monoxide, which is slightly lighter than air and can accumulate at different heights. The installation point should also be close to sleeping areas to ensure the alarm can be heard during the night. Additionally, avoid placing the alarm in locations with high humidity or near vents, as these factors can affect performance. By following these guidelines, the carbon monoxide alarm will function more effectively and enhance safety within the home.
What Locations Should Be Avoided When Installing Carbon Monoxide Alarms?
The locations to avoid when installing carbon monoxide alarms include areas with high humidity, near fuel-burning appliances, obstructed ventilation areas, and near windows or doors.
- High Humidity Areas
- Near Fuel-Burning Appliances
- Obstructed Ventilation Areas
- Near Windows or Doors
Understanding the critical aspects of these locations enhances the effectiveness of carbon monoxide alarms.
-
High Humidity Areas:
High humidity areas should be avoided when installing carbon monoxide alarms. Humidity can affect the performance of the alarm. Moisture can interfere with the alarm’s sensor and lead to false readings or malfunctions. Studies show that devices can become less sensitive to carbon monoxide in high humidity, which diminishes their effectiveness. The U.S. Consumer Product Safety Commission (CPSC) emphasizes maintaining dry, climate-controlled environments for alarm installations. -
Near Fuel-Burning Appliances:
Avoid placing carbon monoxide alarms near fuel-burning appliances. Common appliances include gas stoves, heaters, or water heaters. These appliances can produce small amounts of carbon monoxide during regular operation. If alarms are too close, they may trigger frequent false alarms or fail to detect dangerous levels of carbon monoxide soon enough. The National Fire Protection Association (NFPA) recommends a safe distance of at least 15 feet from these devices. -
Obstructed Ventilation Areas:
Installing alarms in obstructed ventilation areas can prevent proper airflow and hinder the device’s ability to detect carbon monoxide. Alarms can give false readings or fail to alert occupants in emergencies if airflow is restricted. The NFPA advises ensuring alarms are placed where air can circulate freely, away from furniture, curtains, or other obstructions. Effective alarm placement significantly enhances safety in residential areas. -
Near Windows or Doors:
Avoid placing carbon monoxide alarms near windows or doors. These locations can expose the alarms to drafts, affecting their sensitivity. External air movement can dilute the concentration of carbon monoxide before the alarm can effectively detect it. Therefore, the CPSC recommends positioning alarms away from windows and doors to ensure accurate monitoring of indoor air quality. Placing alarms in the center of rooms or hallway intersections is suggested for optimal performance.
What Are the Legal Requirements for Carbon Monoxide Alarm Placement in My Area?
The legal requirements for carbon monoxide alarm placement vary by location, so it is essential to check local regulations. Generally, these laws stipulate where alarms must be installed in residential dwellings.
Key points regarding carbon monoxide alarm placement laws include:
- Required locations (bedrooms, hallways)
- Types of buildings (single-family homes, multi-family dwellings)
- Compliance deadlines (installations by certain dates)
- Maintenance requirements (testing and replacing alarms)
- Local amendments (specific city or county regulations)
Understanding these requirements helps ensure the safety of occupants and adherence to the law.
-
Required Locations: Carbon monoxide alarms must be installed in specific areas according to local codes. Typically, they should be placed outside sleeping areas and on each level of the home. This common requirement helps ensure that alarms can be heard by occupants when CO levels rise.
-
Types of Buildings: Existing regulations often differentiate between single-family homes and multi-family dwellings, such as apartments. For instance, many states mandate alarms in rental properties but may allow single-family homeowners to exercise discretion.
-
Compliance Deadlines: Some jurisdictions enforce deadlines for installing carbon monoxide alarms. This can create urgency for homeowners and landlords to ensure compliance. For example, New York State has set deadlines for when homes need to be equipped with CO alarms.
-
Maintenance Requirements: Local laws typically require that carbon monoxide alarms be tested regularly and replaced after a specified period, usually around 5 to 7 years. This maintenance ensures that alarms function properly and do not fail when needed most.
-
Local Amendments: Some municipalities may have additional specifications or amendments to the general carbon monoxide alarm placement laws. This might include unique requirements for specific building types or additional safety measures. It is crucial for homeowners to consult with local regulations for precise guidance.
By adhering to these legal requirements, individuals can help ensure adherence to safety standards and protect their homes from the dangers of carbon monoxide exposure.
How Can Regular Maintenance Impact the Functionality of Carbon Monoxide Alarms?
Regular maintenance significantly enhances the functionality of carbon monoxide alarms by ensuring their reliability, accuracy, and proper operation over time.
-
Battery checks: Regularly replacing or testing the batteries increases alertness. According to the National Fire Protection Association (NFPA, 2021), nearly 50% of all carbon monoxide alarm failures occur due to dead or missing batteries.
-
Cleaning: Dust and dirt can accumulate on sensors and interfere with operation. The Consumer Product Safety Commission (CPSC, 2022) recommends cleaning alarms every six months to maintain optimal functionality.
-
Testing: Monthly testing of carbon monoxide alarms verifies they are working. A study from the Centers for Disease Control and Prevention (CDC, 2020) highlights that alarms that are tested regularly and function properly can reduce the risk of carbon monoxide poisoning by 60%.
-
Replacement: Carbon monoxide alarms have a lifespan of about 5-7 years. The CPSC suggests replacing units at the end of their lifespan to ensure continued protection.
-
Sensor calibration: Over time, the sensors may become less effective. Regular maintenance may include recalibrating or replacing sensors to ensure they are sensitive to levels of carbon monoxide.
By following these maintenance practices, the performance of carbon monoxide alarms can be maximized, leading to improved safety and reduced health risks.
Related Post: