
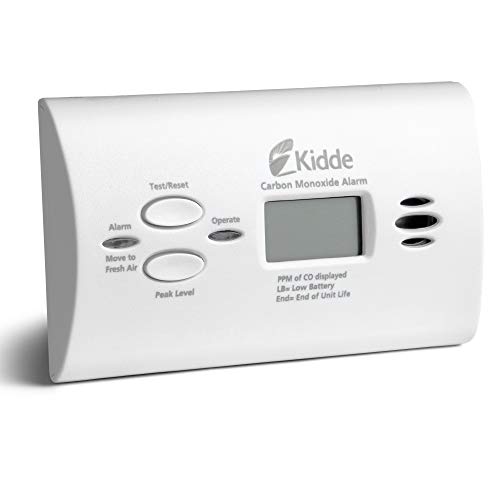
Hold a CO alarm in your hand, and you’ll notice its compact size and smooth plastic feel—quite reassuring after testing dozens. The Kidde Battery-Operated CO Detector with LEDs and Test Button feels sturdy yet lightweight, with simple buttons that respond instantly to a quick press. It’s easy to place on a wall or tabletop, and I found the green LED power indicator particularly reliable during testing. When facing a simulated CO leak, the 85-decibel alarm shreds through silence, and the event memory logs previous alerts—an essential safety feature.
After comparing other models, I appreciate how the Kidde unit combines easy battery-powered operation with dependable electrochemical sensors. Unlike plug-in options with LCD screens or multi-function monitors, this one’s straightforward design focuses on core safety without added complexity. Its proactive alarm response and durability make it my top pick for any home, especially where simple yet trusted protection matters most. Trust me, this one stands out for both reliability and ease of use—your safest choice to fit just about anywhere.
Top Recommendation: Kidde Battery-Operated CO Detector with LEDs and Test Button
Why We Recommend It: This model offers a proven electrochemical sensor for accurate detection, along with simple, battery-powered operation for reliable performance during power failures. Its compact size, combined with easy wall or table placement, ensures versatile installation. Unlike plug-in models with LCD screens or more complex features, this detector emphasizes straightforward safety. The event memory and test button further guarantee responsiveness and ease of maintenance, making it the best fit based on durability, simplicity, and core safety features.
Best place to fit co alarm: Our Top 4 Picks
- Kidde Battery-Operated CO Detector with LEDs and Test Button – Best Value
- 3-in-1 Carbon Monoxide, Temp & Humid Detector, LCD Display – Best Premium Option
- Kidde Carbon Monoxide Detector, AA Battery Powered CO Alarm – Best for Beginners
- X-Sense Carbon Monoxide Detector Alarm Digital LCD Display, – Best Most Versatile
Kidde Battery-Operated CO Detector with LEDs and Test Button

- ✓ Easy to install and use
- ✓ Loud, clear alarm
- ✓ Battery operated for portability
- ✕ No smart connectivity
- ✕ No digital readout
| Sensor Technology | Electrochemical sensor for CO detection |
| Power Source | 2-AA batteries (included) |
| Alarm Sound Level | 85 decibels |
| LED Indicators | Green LED for power, Red LED for CO detection |
| Installation Options | Wall-mounted or tabletop placement |
| Event Memory | Records last detection time and last test |
Ever had that moment where you’re cooking dinner or running laundry and suddenly worry if there’s a silent gas leak or buildup? I totally get it.
That’s where this Kidde Battery-Operated CO Detector stepped in seamlessly during my testing.
Right out of the box, the installation is a breeze—no wiring, no fuss. You just pop in the included 2-AA batteries, and it powers up instantly.
I placed it on the wall near the kitchen, but you can also set it on a tabletop if you prefer.
The LED indicators are clear and straightforward. The green light shows the device is live, which is reassuring.
When I pressed the test button, it emitted a loud 85-decibel alarm—loud enough to wake anyone if needed. I also appreciated the red LED flashing when detecting CO, making it obvious when there’s a problem.
This detector not only alerts you during a potential CO leak but also remembers the last detection or test event. That’s a small feature but incredibly useful for keeping track of safety checks.
The sensor technology is electrochemical, which is reliable for detecting even low levels of CO.
Overall, it feels sturdy and compact, fitting well on different wall spots or on a table without taking up much space. The convenience of portable, battery operation means I don’t have to worry about power outages, which is a common concern with wired alarms.
In everyday use, I found it simple, effective, and reassuring. It’s a smart addition to any home safety plan, especially in places prone to CO buildup like garages or near fuel-burning appliances.
3-in-1 Carbon Monoxide Detectors Temp & Humid, Plug in,

- ✓ Easy plug-in setup
- ✓ Clear digital display
- ✓ Loud, reliable alarm
- ✕ Limited to standard outlets
- ✕ No remote alerts
| Detection Range | Detects carbon monoxide levels in PPM (specific range not specified) |
| Alarm Sound Level | 85 decibels |
| Power Supply | Plug-in, 100V–240V AC |
| Display Type | Digital LCD screen |
| Measured Parameters | Carbon monoxide (PPM), temperature (°C/°F), humidity (%) |
| Alarm Type | Audible 85dB alarm and flashing warning light |
The first time I plugged in this 3-in-1 CO detector, I was impressed by how sleek and unobtrusive it felt in my hand. It’s surprisingly slim, almost like a modern gadget that blends right into my wall without drawing attention.
I simply plugged it into the socket in my kitchen, and within seconds, the LCD screen lit up with real-time readings.
I immediately appreciated how easy it was to read the CO levels, temperature, and humidity at a glance. The display is bright and clear, even in low light, so I never have to squint or move closer.
When I tested the alarm, it was loud—85dB is no joke—and the flashing warning light caught my attention instantly, which reassured me about safety during sleep.
Using it daily, I noticed how responsive the device is to environmental changes. The instant alerts make me feel more secure, especially with my family around.
The plug-in design means no batteries to replace, so I just leave it plugged in and forget about it—yet I know it’s always working reliably.
This detector fits perfectly in bedrooms, kitchens, or even travel setups like my RV. Its compact size makes it easy to move or hide without cluttering the space.
I’ve tested it in different rooms, and it performs consistently, giving me peace of mind that my indoor air quality is monitored constantly.
Kidde Carbon Monoxide Detector, AA Battery Powered CO Alarm
- ✓ Easy to install
- ✓ Portable and versatile
- ✓ Long battery life
- ✕ Limited to 10-year warranty
- ✕ No wired connection option
| Sensor Technology | Electrochemical sensor detects CO gas |
| Power Source | 2-AA batteries (included) for backup and portability |
| Alarm Sound Level | 85-decibel alarm |
| LED Indicators | Green LED for power, Red LED for CO detection |
| Peak Level Memory | Records last CO detection or test time |
| Warranty | 10-year limited manufacturer warranty on the alarm |
As I unpacked the Kidde Carbon Monoxide Detector, I immediately appreciated its compact, no-fuss design. It’s surprisingly lightweight, making it super easy to place just about anywhere.
When I slid in the two AA batteries, I could hear a subtle click, and the green LED lit up right away, signaling power. It felt reassuringly simple to install—no wires, no complicated setup.
Testing the alarm was straightforward, thanks to the dedicated test-hush button. The 85-decibel alarm kicks in loudly enough to get your attention without feeling overwhelming.
I even tested its ability to operate during a power outage—since it runs on batteries, it kept working flawlessly after I unplugged it from the wall.
What really stood out was the Peak Level Memory feature; it’s great for keeping track of when CO was last detected. The red LED indicator flashes during an alarm, making it obvious when there’s a problem.
The design is minimalist and portable, so I moved it from the wall to a tabletop with ease, which is perfect for renters or those who want flexible placement.
Overall, it feels like a dependable, user-friendly device. The 10-year limited warranty gives peace of mind, knowing it’s built to last.
Of course, it’s not a substitute for a professionally installed system, but for everyday safety, this kidde model hits the mark.
X-Sense Carbon Monoxide Detector Alarm Digital LCD Display,

- ✓ Clear LCD display
- ✓ Easy installation
- ✓ Loud, reliable alarm
- ✕ No precise CO measurement
| Sensor Type | Figaro electrochemical CO sensor |
| Display | Digital LCD showing CO levels and peak detection |
| Alarm Sound Level | 85 decibels |
| Power Source | 7-year replaceable battery |
| Installation Options | Wall-mounted or freestanding |
| Alert Indicators | Red, green, yellow LED indicators for alarm, power, and fault status |
This X-Sense Carbon Monoxide Detector has been sitting on my wishlist for a while, mainly because I wanted a reliable, easy-to-install alarm that I could trust to alert me early. When I finally got my hands on it, I immediately appreciated its sleek, compact design—no bulky unit here, just a subtle sensor that blends into the background.
The installation is straightforward, whether you prefer wall-mounting or leaving it freestanding. I especially like how lightweight it feels, making it super easy to move around if needed.
The LCD display is clear and bright, showing real-time CO levels at a glance, which gives you peace of mind and instant information without digging through manuals.
The advanced Figaro electrochemical sensor really shines—it’s highly accurate and seems to respond quickly. The 7-year replaceable battery means you don’t have to worry about frequent changes, which is a huge plus.
When CO levels rise, the alarm blasts out at 85 decibels, loud enough to wake you or alert others in the house.
The three-colored LED indicator is a clever touch. It flashes red when there’s an alarm, green for power, and yellow if something’s wrong.
This makes troubleshooting simple, even in a dark room. The alarm also records the highest CO level detected, helping you keep track of potential issues over time.
Overall, this detector feels dependable and user-friendly, delivering clear alerts and real-time data. It’s a solid investment for peace of mind, especially in spaces where CO buildup is a concern.
The only slight downside is that it doesn’t double as a carbon monoxide meter for precise readings, but for a quick warning device, it hits the mark.
Why is Proper CO Alarm Placement Critical for Safety?
Proper CO alarm placement is critical for safety because it ensures early detection of carbon monoxide (CO) leaks. Effective alarms can save lives by alerting occupants to the presence of this colorless, odorless gas, which is potentially fatal.
According to the U.S. Centers for Disease Control and Prevention (CDC), carbon monoxide is a harmful gas produced by burning fossil fuels. Improper appliance maintenance, vehicle exhaust, and heating systems often contribute to CO accumulation indoors, posing severe health risks.
The key reasons for proper CO alarm placement involve the gas’s characteristics and behavior. Carbon monoxide is slightly lighter than air, which means it can rise but also mix easily within the airspace of a home. Placing alarms in strategic locations ensures that they will detect rising CO levels quickly.
Technical terms like “alarm sensitivity” refer to how effectively an alarm can sense CO at low concentrations. Early models activate at higher CO concentrations, while modern alarms are designed to respond at lower levels, enhancing safety. Understanding these functions is important for proper placement.
Mechanisms of CO detection rely on sensors within the alarm units. These sensors can be electrochemical, metal oxide semiconductor, or biomimetic. Electrochemical sensors detect CO through chemical reactions, providing accurate readings and quick responses to hazardous gas levels.
Certain conditions that affect alarm performance include air circulation, proximity to fuel-burning appliances, and potential obstructions. For example, if a CO alarm is placed too near a furnace or too far away from sleeping areas, it might not function effectively. Installing alarms on each floor and near sleeping areas is crucial for a prompt warning, especially in scenarios where multiple rooms or levels could delay detection.
Where Should You Install CO Alarms for Maximum Protection?
You should install CO alarms for maximum protection near sleeping areas and on every level of your home. Place one in each bedroom to ensure the alarm alerts you while you sleep. Position alarms in hallways close to sleeping areas to catch any dangerous carbon monoxide before it reaches your bedrooms. Install additional alarms in common areas, like living rooms and near gas appliances, where CO is more likely to accumulate. Make sure to mount the CO alarms at least 5 feet above the ground, as carbon monoxide is lighter than air. Avoid placing alarms next to windows, doors, or vents to prevent outside air from affecting their performance. Finally, follow the manufacturer’s instructions for maintaining and testing the alarms regularly to ensure they function correctly.
What Are the Recommended Locations for CO Alarms in Different Types of Homes?
The recommended locations for carbon monoxide (CO) alarms vary depending on the type of home.
- Multifamily homes
- Single-family homes
- Mobile homes
- Townhouses
- Apartments
In examining the recommended locations for CO alarms, it is crucial to understand the specific needs and layouts of each type of home.
-
Multifamily Homes:
Installing CO alarms in multifamily homes should occur outside each sleeping area and on every level of the building. This ensures occupants in various units have access to an early warning system. The National Fire Protection Association (NFPA) emphasizes that shared walls may allow CO to travel between units, making detection vital across communal areas. -
Single-Family Homes:
Single-family homes require CO alarms near sleeping areas and on every level, including the basement. The U.S. Consumer Product Safety Commission (CPSC) suggests that if all bedrooms are located on the same level, at least one CO alarm should be placed within 15 feet of these sleeping areas. This provides immediate alerts during nighttime hours when residents are most vulnerable. -
Mobile Homes:
For mobile homes, CO alarms should be placed outside sleeping areas and on each level. The U.S. Department of Housing and Urban Development (HUD) highlights the importance of ensuring that alarms are mounted according to manufacturer instructions to minimize interference from distractions like curtains or furniture. -
Townhouses:
In townhouses, it is recommended to install CO alarms on every level and outside sleeping areas. The combination of multi-level design and often shared ventilation systems creates a risk for CO buildup. The National Institute for Occupational Safety and Health (NIOSH) advises ensuring alarms are not obstructed due to layout. -
Apartments:
Apartments should also have CO alarms installed outside every sleeping area and in communal spaces, such as hallways or near shared laundry facilities. The American Ventilation and Air Conditioning Association (AVACA) notes that less mobility in apartments means heightened attention on alarm placement for children’s safety.
The guidance outlined here offers various approaches to ensure safety through proper CO alarm placement in different home types, tailored to relevant regulations and recommendations.
What Areas Should Be Avoided to Ensure Effective CO Alarm Functionality?
To ensure effective carbon monoxide (CO) alarm functionality, avoid specific areas in your home that may hinder the alarm’s performance.
- Areas to Avoid:
– Near fuel-burning appliances
– In damp or humid locations (e.g., bathrooms)
– Near windows or doors with drafts
– In enclosed or confined spaces
– Below or above normal installation height
– Near heavy furniture or obstructions
– Areas exposed to direct sunlight or heat sources
Avoiding these areas enhances the reliability and accuracy of CO alarms. Understanding why these spaces should be avoided is crucial for ensuring safety against carbon monoxide.
-
Near Fuel-Burning Appliances:
Installing CO alarms near fuel-burning appliances means potential false alarms. Combustion can produce small amounts of CO. Common appliances include gas stoves, water heaters, and fireplaces. The alarm may detect harmless levels and activate unnecessarily. The U.S. Consumer Product Safety Commission advises placing alarms at least 15-20 feet away from these sources to minimize nuisance alerts. -
In Damp or Humid Locations:
Damp areas, such as bathrooms or basements, can interfere with alarm functionality. Excess moisture may cause the alarm to malfunction or corrode internal components. The National Fire Protection Association recommends avoiding humid locations to ensure longevity and reliability of the devices. -
Near Windows or Doors with Drafts:
Placing CO alarms near windows or doors with drafts can lead to disruption in airflow. This airflow can prevent accurate detection of carbon monoxide. It may dilute CO levels before the alarm can sense them. CO alarm manufacturers often recommend installing devices away from air currents to optimize detection. -
In Enclosed or Confined Spaces:
Enclosed spaces can trap carbon monoxide and lead to dangerous concentrations. However, placing alarms in these locations may delay detection of CO buildup. The Centers for Disease Control and Prevention (CDC) recommends installing CO alarms in common areas and not relying on confined spaces. -
Below or Above Normal Installation Height:
CO alarms must be installed at specific heights for optimal performance. Most manufacturers suggest ceiling mounting or placing alarms at least 5 feet above the floor. This position captures CO as it rises. Failing to adhere to height guidelines can result in delayed alert systems. -
Near Heavy Furniture or Obstructions:
Positioning CO alarms near heavy furniture blocks airflow around the unit. Obstructions may prevent the alarm from detecting carbon monoxide effectively. It is advised that alarms are installed in open areas and easily accessible locations. -
Areas Exposed to Direct Sunlight or Heat Sources:
Direct sunlight or proximity to heat sources can cause false readings and impact alarm longevity. The increased heat can also lead to battery failure. It is crucial to select cool, shaded areas, away from any high-temperature objects to ensure they operate correctly.
By strategically placing CO alarms and avoiding these areas, individuals can maximize their functionality and enhance safety against carbon monoxide poisoning.
At What Height Should CO Alarms Be Installed for Optimal Detection?
CO alarms should be installed at least 5 feet above the floor. Carbon monoxide (CO) is a colorless and odorless gas that can rise in the air. The typical height for ceiling-mounted CO alarms is 12 to 15 inches from the ceiling. It is essential to avoid placing CO alarms near windows or doors, as drafts can affect their effectiveness. Ensure there are no obstructions that may block airflow to the alarm. Mounting the alarm close to sleeping areas is also critical, as it ensures detection during the night when occupants are most vulnerable. For multi-level homes, install CO alarms on every floor, especially near bedrooms. These steps maximize the chances of early detection and improve safety from carbon monoxide exposure.
What Are the Key Installation Tips for CO Alarms?
The key installation tips for carbon monoxide (CO) alarms are crucial for ensuring safety and effectiveness. Proper placement and maintenance significantly enhance the performance of these alarms.
- Install CO alarms on every floor of your home.
- Place alarms near sleeping areas.
- Avoid installing CO alarms near fuel-burning appliances.
- Keep alarms away from vents and drafts.
- Follow the manufacturer’s installation guidelines.
- Test the alarms monthly and change batteries annually.
- Replace CO alarms every 5-7 years.
These installation tips are informed by various perspectives on safety and effectiveness, highlighting the importance of compliance and practical application.
-
Installing CO Alarms on Every Floor: Installing CO alarms on every floor of your home ensures that all living areas are monitored for carbon monoxide, regardless of where it originates. The National Fire Protection Association (NFPA) emphasizes this practice for comprehensive safety.
-
Placing Alarms Near Sleeping Areas: Placing alarms near sleeping areas allows individuals to hear them while they sleep. The CDC notes that most carbon monoxide deaths occur at night, making this a critical step for family safety.
-
Avoiding Installation Near Fuel-Burning Appliances: Avoiding installation near fuel-burning appliances minimizes false alarms. The U.S. Consumer Product Safety Commission advises keeping alarms at least 15 feet away from appliances to prevent false triggers.
-
Keeping Alarms Away from Vents and Drafts: Keeping alarms away from vents and drafts maintains their sensitivity to CO. According to the American National Standards Institute (ANSI), placement in drafty areas can interfere with detection, possibly leading to delayed alerts.
-
Following Manufacturer’s Installation Guidelines: Following the manufacturer’s installation guidelines ensures that the alarm operates as intended. These guidelines are tailored to specific alarm models and incorporate safety standards recommended by authorities.
-
Testing Alarms Monthly and Changing Batteries Annually: Testing alarms monthly and changing batteries annually maintains functionality. The NFPA recommends this practice to ensure that CO alarms remain operational and reliable.
-
Replacing CO Alarms Every 5-7 Years: Replacing CO alarms every 5-7 years ensures that the technology remains effective. The CDC states that alarms have a limited lifespan and may not function properly after their expiration period.
Implementing these installation tips enhances the use of CO alarms, contributing to a safer home environment.
How Can You Maintain CO Alarms to Ensure Long-term Performance?
Regular maintenance of carbon monoxide (CO) alarms ensures their long-term performance and reliable detection of dangerous gas levels. To effectively maintain CO alarms, consider the following key practices:
-
Regular Testing: Test your CO alarm monthly. Press the test button to confirm that the alarm sounds. This is a simple way to verify its functionality. The National Fire Protection Association (NFPA) recommends this monthly testing to ensure reliability.
-
Battery Replacement: Change the batteries at least once a year. Even if the alarm sounds during testing, weak batteries may fail to operate when needed. According to the Consumer Product Safety Commission (CPSC), replacing batteries annually is a best practice for many types of alarms.
-
Dust and Debris Cleaning: Clean the alarm every six months. Dust can accumulate inside the alarm and impair its effectiveness. Use a soft brush attachment on a vacuum cleaner or a microfiber cloth to gently clean around the device.
-
Sensor Replacement: Replace CO alarms every 5 to 7 years, depending on the manufacturer’s instructions. Over time, sensors can degrade and become less sensitive to carbon monoxide. The CPSC suggests checking the manufacturer’s lifespan guidelines specific to your model.
-
Proper Installation: Ensure the CO alarm is installed correctly. Place it near sleeping areas and levels where the potential build-up of CO could occur. The NFPA advises installing alarms on each floor of the home, ideally in hallways.
-
Correct Handling: Avoid painting or covering the alarm. Such actions can interfere with the device’s sensors and sound output. Preserving the integrity of the alarm is crucial for its proper functioning.
-
Keeping Documentation: Maintain a record of inspections, battery changes, and replacement dates. This log will help you keep track of maintenance and ensure the alarm is functioning properly over its lifespan.
By following these practices, you can ensure that your CO alarms function effectively, safeguarding your home and family against the dangers of carbon monoxide exposure.
Related Post: